Visit Mee on my Website!

Visit Mee on my Website!
Visit www.dsmeebee.com

Monday, August 15, 2011

Boston's Rose Kennedy Greenway Open Market

Rose Kennedy Greenway Open Market!
http://www.greenwayopenmarket.com/


Even as a Bostonian I will find new fun things to do in Boston every once in awhile. A few weeks ago I heard from a friend about the Greenway Open Market. I had been to the SOWA Open Market many times but had never heard of the Greenway Open Market. Many of venders are similar to the SOWA market but the Greenway is a wonderful location for an open market. It’s a great way to spend a Saturday! Get off the T at Government Center and pick up some fresh veggies at the farmers market and walk down the Greenway passed Quincy Market and find handmade jewelry, crafts, baby clothes, t-shirts, and much more. The best part of the Greenway Open Market is that all the venders are local Boston companies so you can feel good about supporting the local artist!

One group of local Architects were selling T-shirts to support the architectural research they are doing. They are called Figure Ground and I love the graphic bold style of their shirts!


Tuesday, August 9, 2011

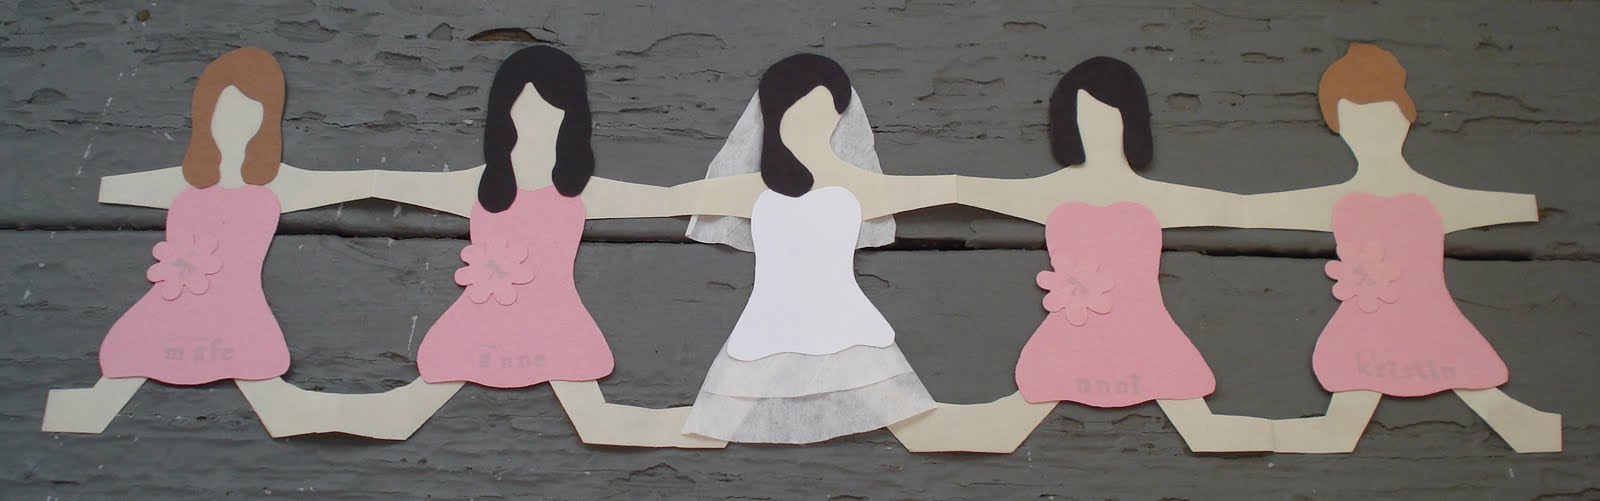
Paper Doll Bridesmaid Card - Free Template

Will you be my bridesmaid card tutorial! 


I wanted a special way to ask my friends to be my bridesmaids. I love the idea of giving my friends something special and handmade that they can keep for years. 


Things you will need:


  • DSMeeBee Free Paper Doll Template
  • Colored Paper $5
    • There are so many beautiful papers out there. Use what works best for your budget and the look you want. Either way plain paper vs. fancy paper you will get a great looking card.
  • Large sheet of skin color paper  $2
    • Depends on how many bridesmaids you have (for mine I used a 15”x20” sheet from Paper Source but you could use Kraft paper or even a paper shopping bag from the grocery store.
  • Envelopes $10 for 5
    • The envelopes I bought from Paper Source were a bit on the pricey side but they fit the dolls perfectly and I also used them as the card itself.
  • Letter Stamps and Ink $30
    • I bought my stamps and ink from Paper Source but I am sure you can find cheaper at a big box craft store. 
  • Flower Paper Punch $5
    • You can find paper punches at any craft store. 
  • Double sided tape $2
Total Amount for 4 Cards = $54 (but the stamps will be something I can use again and again)

Things from around the house:

  • Scissors or Utility Knife
  • Coffee Filter
  • Pencil
Step 1: 
Print out the DSMeeBee Free Paper Doll Template and cut out each template. 
Step 2:
Take your large piece of skin colored paper and fold it the width of the paper doll templates arms. Then keep folding as if it were an accordion the amount of dolls you want. If the paper is too small you can tape another to it but only on the “back” side. (If you have a big bridal party consider making only two dolls for each bridesmaid and make one the receiving bridesmaid and one you the bride.) 
Step 3:
Once you have the correct amount of folds (one per doll) then fold the accordion flat and trace the paper doll template on the top face with a pencil. 

Step 4: 
Once the silhouette of the doll is traced cut it out. Be careful not to cut the edges of the feet and hands they will act as connectors for the chain.


Step 5: 
Unfold and now you have a paper doll chain! Using the DSMeeBee Paper Doll Template cut out the hair and dress templates and trace them on the colored paper of your choosing. Or make your own design for dresses and hair styles. 


Step 6:
After everything is cut out use the double sided tape and tape on the hair and dresses to the dolls. I used the flower paper punch to make a little flower belts for my bridesmaids. I also used a coffee filter for the ruffles of the wedding dress and veil. 


Step 7:
Use the letter stamps to write out “Will you be my bridesmaid?” on the inside of the card. I also stamped each bridesmaid’s name on their dresses and in the front of the card/envelope. 


Step 8: 
To give the card a band of color I cut a 2” colored paper band of paper and taped it the size of the envelope and used the flower punch to show a stamp behind it. 


Step 9:
Make a brunch of it! Invite all your bridesmaids to a favorite brunch spot and ask them over mimosas. They can’t say no to being your bridal slaves after a card like that….just kidding….but seriously this is a really nice memorable and special way to ask your good friends to be part of one of the most important days of your life. ENJOY! 

Monday, August 8, 2011

Cambridge Antique Market – A Hidden Gem in Boston!

Cambridge Antique Market – A Hidden Gem in Boston!
I live close by the Cambridge Antique Market and have driven by it hundreds of times but really never knew what it was (and I have lived here for almost 10 years)! While doing a Google search for antique and flea markets in the Boston area I came across the Cambridge Antique Market. I recognized the exterior of the building from driving by it and I finally went in this weekend. OMG! This place is CRAZY!  If you are looking for hours of poking through an enormous amount of antique and vintage things from china, bikes, furniture, clothing, paintings, jewelry, playboy magazines, and honestly I think if you looked hard enough you could find anything there! It is truly a smorgasbord of things! This place has FIVE floors packed full of treasures ready to be found. The floors go on and on and it is really a treat to turn the corner and not know what you could find next. The prices go from wow I would never pay that much to wow that is really cheap. So it is truly a hit a miss type of place price wise but for me it was a new GEM in Boston. I bought a 38 piece white with gold trim porcelain tea set for $25! I feel pretty good about my find 

and I can’t wait to go back. The other great part of the antique market is that it is less than a 10 minute walk from the Lechmere train station. Hope you enjoy it as much as I did!  


201 Msgr. O'Brien Highway - Cambridge, MA  02141
Phone  617-868-9655
OPEN TUESDAY-SUNDAY 11am to 6pm

Saturday, July 30, 2011

Knit Baby Blanket With Hood! Free Pattern!


This is a simple knit baby blanket. It does take awhile to knit but the pattern is super simple. I used 4 scans of Lion Brand yarn (color 173) Dusty Green. I used 100% acrylic yard because it is easier to wash than wool but of course you can use any natural fiber yarn as well. For the dragon tail I used one scan of Lion Brand yarn (color 125) Taupe and for the flowers I used one scan of Lion Brand Pink. The white centers of the flowers I used a white cotton yarn but you could used anything or any color. 

Blanket:

I used size 8 US 32in circular needles and casted on 150 stitches. I did a simple stockinette stitch and reversed it every 5 inches. A stockinette stitch is when you knit on the right side and then you purl on the wrong side. When you want to reverse the stitch you knit on the right side and when you turn over your knitting instead of purling on the wrong side you knit again. Then you continue every other row purling and knitting till you knit 5 inches and then reverse the pattern again. I made my blanket 35" x 35" which is a nice big size so the baby that you give it to can grow into it. 


Hood:

Cast On -  50 stitches
Work as though you were in the blanket. (Stockinette 5 inches and then reverse)
Except you must decrease - every right side (knit) row: K1, slip slip knit, k to 3 st from end, k2tog, K1
Decrease till you have 3 stitches left and then bind off.
After you bind off cut a long tail from the scan of yarn so you have enough to sew the triangular hood to one corner of the blanket. 


Dragon Tale:

Cast on 7 stitches
R1: Knit 5, increase by working into front and then back of stitch, Knit 1
R2: Knit 1, increase in next stitch, Knit 6
R3: Knit 7, increase in next stitch, Knit 1
R4: Knit 1, increase in next stitch, Knit 8
R5: Knit 9, increase in next stitch, Knit 1
R6: Knit 1, increase in next stitch, Knit 10
R7: Knit 11, increase in next stitch, Knit 1
R8: Knit 1, increase in next stitch, Knit 12
R9: Knit 12, Knit 2 Together, Knit 1
R10: Knit 1, Knit 2 Together, Knit 11
R11: Knit 10, Knit 2 Together, Knit 1
R12: Knit 1, Knit 2 Together, Knit 9
R13: Knit 8, Knit 2 Together, Knit 1
R14: Knit 1, Knit 2 Together, Knit 7
R15: Knit 6, Knit 2 Together, Knit 1
R16: Knit 1, Knit 2 Together, Knit 5

Repeat Rows 1-16 till you have a til long enough to run down the hood and the back of the blanket. Then bind off and sew into the back of the hood and blanket. 


Flowers:

For the flowers I worked in garter stitch. 
Cast on 7 stitches
R1: Knit
R2: Knit 1, Increase 1, Knit till you have one stitch left, Increase 1, Knit 1 (9 stitches)
R3: Knit
R4: Knit 1, Increase 1, Knit till you have one stitch left, Increase 1, Knit 1 (11 stitches)
R5: Knit
R6: Knit 1, Decrease 1, Knit till you have one stitch left, Decrease 1, Knit 1 (9 stitches)
R7: Knit
R8: Knit 1, Decrease 1, Knit till you have one stitch left, Decrease 1, Knit 1 (7 stitches)
R9: Knit
R10: Knit 1, Decrease 1, Knit till you have one stitch left, Decrease 1, Knit 1 (5 stitches)
R11: Knit
R12: Knit 1, Decrease 1, Knit till you have one stitch left, Decrease 1, Knit 1 (3 stitches)
Bind Off, cut a long enough tail to sew into the next peddle. 

Make 5 peddles and then sew each peddle into the next. 

Middle of the flower:

Cast on 3 stitches
R1: Knit
R2: Knit 1, Increase 1, Knit till you have one stitch left, Increase 1, Knit 1 (5 stitches)
R3: Knit
R4: Knit 1, Increase 1, Knit till you have one stitch left, Increase 1, Knit 1 (7 stitches)
R5: Knit
R6: Knit 1, Decrease 1, Knit till you have one stitch left, Decrease 1, Knit 1 (5 stitches)
R7: Knit
R8: Knit 1, Decrease 1, Knit till you have one stitch left, Decrease 1, Knit 1 (3 stitches)
Bind off and sew into the top of the peddles. After the flowers are assembled then arrange the flowers on the blanket and then sew them into the blanket. I put one on the hood as an accent. 

Engagement Shoot In Boston

These are a few samples of my Engagement Shoot at the Boston Public Library and in the Boston Commons. I love the look of the Boston Public Library and it was amazing to take photos there. I would have loved to have my wedding there but of course it is way out of my budget so a second great choice was to have my engagement photos taken there! I also planned my photos the first week of May which was a perfect time for the beautiful pink flowering trees in the Commons. I hope that these can be a source of inspiration for the brides to be out there!


Pictures from inside the Boston Public Library


Pictures from the Boston Commons

Will You Be My Bridesmaid?

Want a special way to ask your girlfriend's to be your bridesmaids? This is how I did it! 
Tutorial to come!