

 |
| Use your Cake Stand for Jewelry |
Make Your Own 3 Tier Cake Stand!
I LOVE vintage china and know it is the look I want for my wedding. A few weeks ago I went to the Cambridge Antique Market in Boston MA http://dsmeebee.blogspot.com/2011/08/cambridge-antique-market-hidden-gem.html and found a white 38 piece china tea set for only $25! I knew when I saw them they were perfect for making my very own 3 tier cake stands for the dessert buffet at my wedding. This tutorial will show you how to make a 3 tier cake stand with any antique dishes you can find.

What you will need:
- DSMeeBee Free Peony Stencil


- At least 3 plates of varying sizes or same size plates. $3
- I used two different size plates and one sugar dish
- Tile and Glass Drill Bit – Home Depot $9 for a set of 4
- #8-32 x 36” Threaded Rod – Home Depot $2
- 1/2” Pex Pipe PVC – Home Depot $2
- Hack Saw – Home Depot $4
- Combo Pack of #8-32 nuts and 1/4” washers – Home Depot $5
- Drawer Pull – Home Depot $4
- Pipe Cutter – Home Depot $6
- Spray Paint that bond to plastic (whatever color you want)– Home Depot $6
- Acrylic Sealer Spray – Craft Store $7
- Glass Paint – Craft Store $6
- Contact Paper – Craft Store $2
Things you will need from home:
- Drill
- Tape
- Utility Knife
- Cutting Matte
- Pencil
- Ruler
- Thin Paint Brushes
- 2 Pairs of Pliers or 2 Small Wrenches
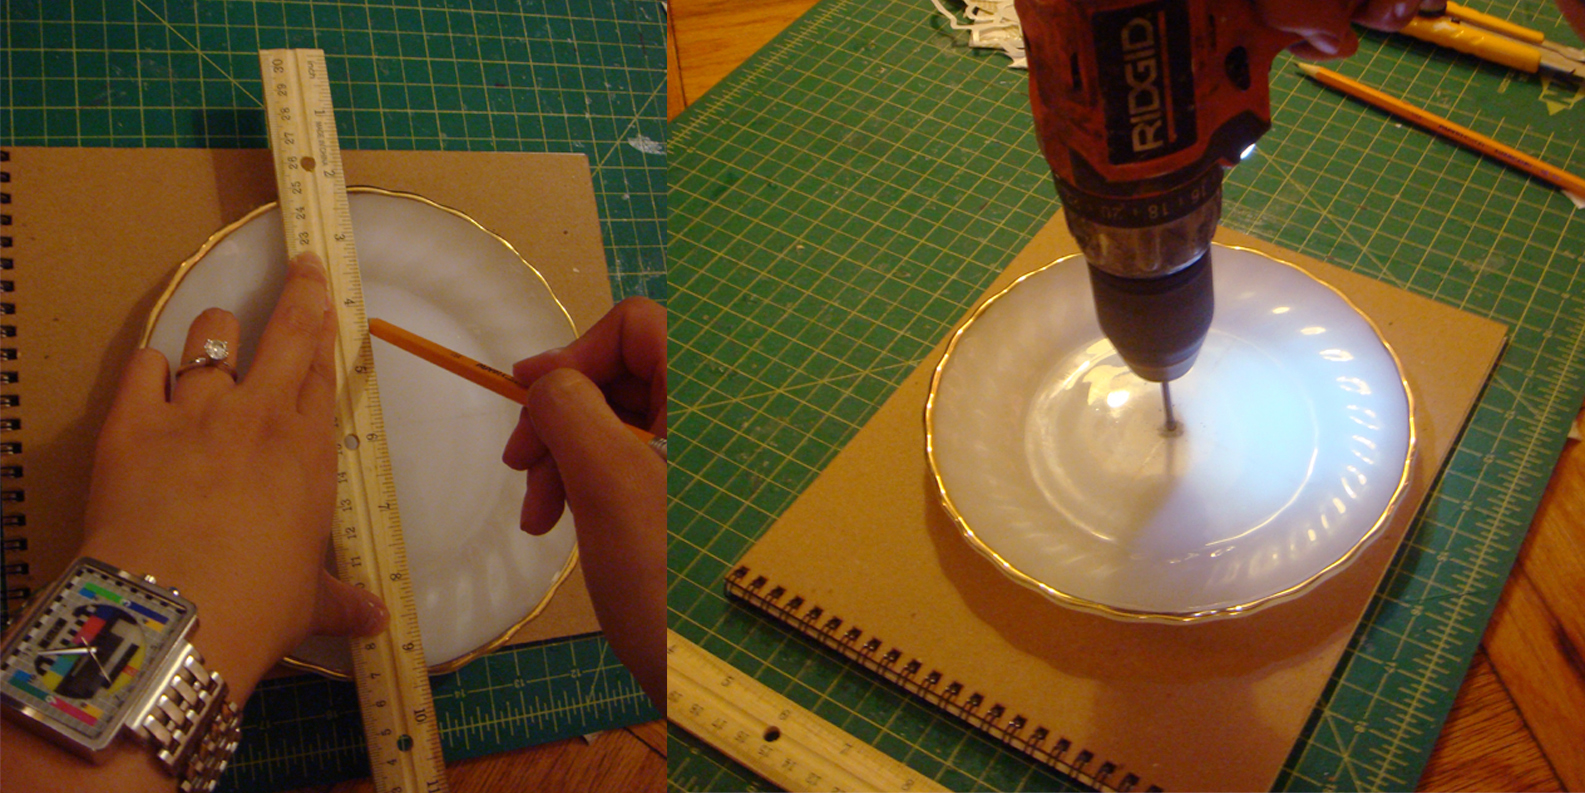
Step 1:
Measure the plates and or tea cups and use your pencil to mark the center point. After you have marked the center use your tile and glass drill bit to drill through your plate. I used the 1/4” bit which fit the #8-32 threaded rod perfectly. After the 3 pieces of china are drilled whip them down.
Step 2: (Optional)
My plates were white with gold trim so I wanted to add interest to the base plate by painting it. Print out the DSMeeBee Free Peony Stencil and cut out the size you wish to paint on your plate. I roughly cut out the largest stencil and taped it onto my contact paper. Once I taped the stencil on the contact paper I used my utility knife to cut out the white portions of the peony stencil. After the stencil was cut out I pealed the back of the contact paper off and applied it to the plate I wanted to paint. Then I used a very thin layer of glass paint to fill in the stencil. I let the paint dry and pealed the contact paper stencil off. I hand painted over the thin layer of paint that was already on the plate and outlined the peony stencil with gold to match the gold trim on the plates.

 |
| Add a hand painted touch! |
Step 3:
Using your ruler measure approximately 16” on your threaded rod and cut it with your hack saw. Once your threaded rod is cut to the desired length take your PVC pipe and cut 2 pieces measuring 4” each and 1 piece measuring 8”. You can cut the PVC many ways but I used a pipe cutter which gave me a nice straight cut without using any power tools.

Step 4:
Using a plastic bonding spray paint spray your PVC the desired color you want and let it dry.
Step 5:
Take your base plate and thread your threaded rod through the hole you already drilled. On the bottom of the plate place a washer and nut. On top of the plate also place a washer and nut and using your 2 pairs of pliers or 2 wrenches or combo of each to tighten both nuts against each other to keep your plate in place. Taking another nut screw it down to approximately 8” from the base plate. Then take your painted 8” PVC pipe and cover the threaded rod making sure the top of the nut sits level with the top of the PVC pipe. Then take your washer and cover the top of the PVC pipe with it. This is where your next plate will site so it has to be nice and tight.

Step 6:
Take your second plate and put it on top of your PVC pipe, nut, and washer sandwich. Then put your next washer on top of your second plate and secure it down with another nut. Use your wrench or pliers to tighten the nut down until the whole assembly feels really tight. Then again screw down a nut on the threaded rod to approximately 4” from the top. Take one of the 4” painted PVC pipes and cover the assembly. Following Step 5 make sure the top of the nut is level with the top of the pipe. Place a washer on top of the pipe and put the third plate or tea cup on top of that assembly. Using your pliers or wrench tighten the third plate or tea cup with a washer and nut. On top of that again place your final piece of PVC and tighten it down with the drawer pull. Make sure the drawer pull you buy fits the threaded rod you are using.

Using a tea cup as part of your cake stand can be an awesome addition. The tea cup can be used to hold silverware, loose tea, cookies, jewelry, or anything you want. These unique cake stands can be used used for wedding dessert buffets, bridal showers, tea with the ladies, and a jewelry stand.
 |
Put desserts or teas on your cake stand.   |
wow, amazing!!
ReplyDeleteGlad you like it :) Thanks for the comment!!!
ReplyDeleteGorgeous!!!
ReplyDeleteThanks!!! If you make one let me know....I would love to see yours!
ReplyDelete