

Will you be my bridesmaid card tutorial!

I wanted a special way to ask my friends to be my bridesmaids. I love the idea of giving my friends something special and handmade that they can keep for years.
Things you will need:

- DSMeeBee Free Paper Doll Template


- Colored Paper $5
- There are so many beautiful papers out there. Use what works best for your budget and the look you want. Either way plain paper vs. fancy paper you will get a great looking card.
- Large sheet of skin color paper $2
- Depends on how many bridesmaids you have (for mine I used a 15”x20” sheet from Paper Source but you could use Kraft paper or even a paper shopping bag from the grocery store.
- Envelopes $10 for 5
- The envelopes I bought from Paper Source were a bit on the pricey side but they fit the dolls perfectly and I also used them as the card itself.
- Letter Stamps and Ink $30
- I bought my stamps and ink from Paper Source but I am sure you can find cheaper at a big box craft store.
- Flower Paper Punch $5
- You can find paper punches at any craft store.
- Double sided tape $2
Total Amount for 4 Cards = $54 (but the stamps will be something I can use again and again)
- Scissors or Utility Knife
- Coffee Filter
- Pencil
Print out the DSMeeBee Free Paper Doll Template and cut out each template.
Step 2:
Take your large piece of skin colored paper and fold it the width of the paper doll templates arms. Then keep folding as if it were an accordion the amount of dolls you want. If the paper is too small you can tape another to it but only on the “back” side. (If you have a big bridal party consider making only two dolls for each bridesmaid and make one the receiving bridesmaid and one you the bride.)

Step 3:
Once you have the correct amount of folds (one per doll) then fold the accordion flat and trace the paper doll template on the top face with a pencil.

Step 4:
Once the silhouette of the doll is traced cut it out. Be careful not to cut the edges of the feet and hands they will act as connectors for the chain.


Step 5:
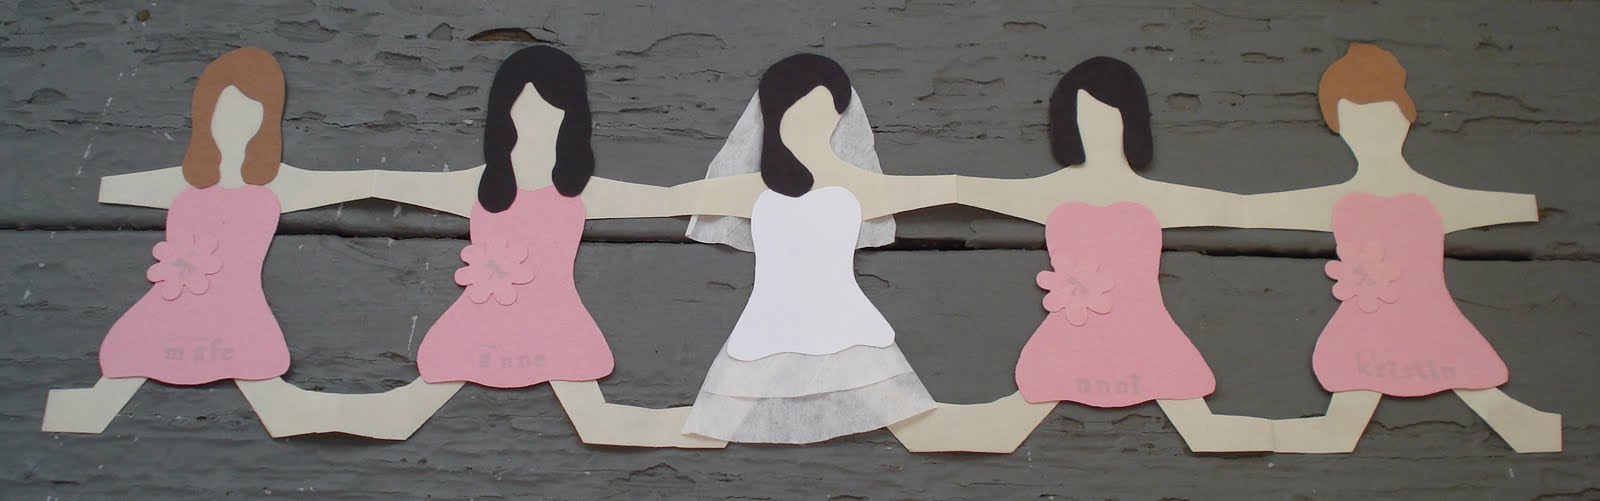
Unfold and now you have a paper doll chain! Using the DSMeeBee Paper Doll Template cut out the hair and dress templates and trace them on the colored paper of your choosing. Or make your own design for dresses and hair styles.

Step 6:
After everything is cut out use the double sided tape and tape on the hair and dresses to the dolls. I used the flower paper punch to make a little flower belts for my bridesmaids. I also used a coffee filter for the ruffles of the wedding dress and veil.


Step 7:
Use the letter stamps to write out “Will you be my bridesmaid?” on the inside of the card. I also stamped each bridesmaid’s name on their dresses and in the front of the card/envelope.

Step 8:
To give the card a band of color I cut a 2” colored paper band of paper and taped it the size of the envelope and used the flower punch to show a stamp behind it.

Step 9:
Make a brunch of it! Invite all your bridesmaids to a favorite brunch spot and ask them over mimosas. They can’t say no to being your bridal slaves after a card like that….just kidding….but seriously this is a really nice memorable and special way to ask your good friends to be part of one of the most important days of your life. ENJOY!
Wow!!! This is awesome. What a great idea :)
ReplyDeleteI love this idea! :)
ReplyDeletexxx mervi
Thanks for the comments....my bridesmaids loved them and I loved giving them! :)
ReplyDeleteThis is so nice. I appreciate your design. Have you work before as a designer with any Plastic cards printing and designing company?
ReplyDeleteHello Safdar,
ReplyDeleteNo I have never worked for that company. I am a freelance designer.....to see more of my work you can go to www.dsmeebee.com
Thanks!
Great post. Where i can get the best designs for plastic business cards?
ReplyDelete