


This
simple easy to follow tutorial will make you a beautiful necklace for
a bride, bridesmaid, mother of the bride, or just for a night out. You can
make a unique piece of jewelry for a wedding, honeymoon, or
rehearsal dinner to make it extra special. The best part will is that this
gorgeous necklace will cost you less than $10 to make. Chic style for
less....can't beat that!
- DSMeeBee – Free Bib Necklace Stencil
- Satin Ribbon - $0.50 a yard
- Depending on how low you want your necklace to hang get the more or less ribbon. I used 2 yards of ribbon for my necklace, 1 yard for each side.
- 8 ½” x 11” sheet of felt – $0.50
- Any color felt you want, I used Ivory.
- Lace Trim - $.40 a yard
- Loose pearls of different sizes - $2.00
- I bought mine on Ebay!
- 24” strand of pearls - $2.00
- I bought mine on Ebay!
- Foam Brush - $0.50
Things
from home:
- Scissors
- Elmer’s Glue
- Gorilla Glue
- The one that drys white and 2x faster....this stuff is crazy good but only use a little because it expands when it dries.
- Needle and thread
- Pen

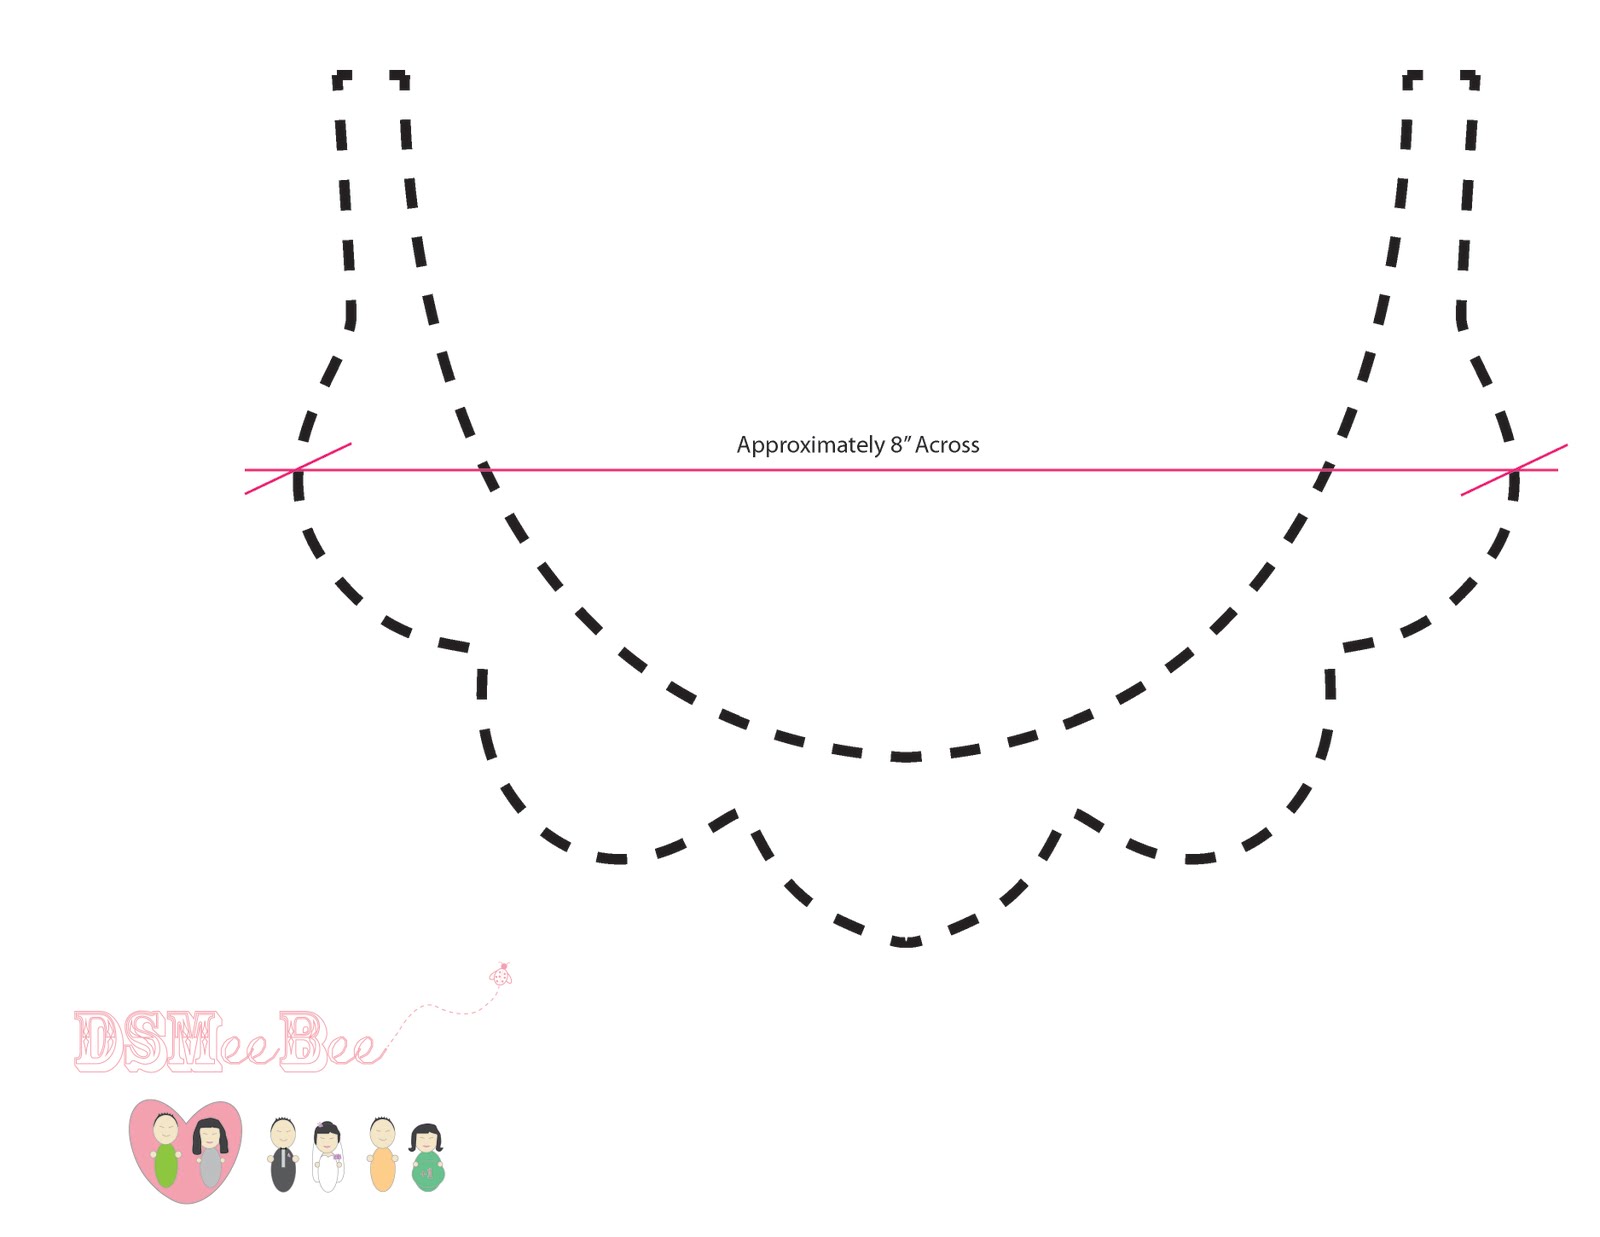
Step 1:
Print
out the DSMeeBee – Free Bib Necklace Stencil fold it in half and
cut it out. Using your foam brush paint a generous amount of Elmer’s
Glue on to the lace trim and place it on to the felt. Fold the glued
felt and lace in half and trace the stencil on to it, then cut it
out. When you unfold the felt with the lace facing up and add more
Elmer’s Glue.


Step 2:
I used 3
different loose pearls 2 the same size and 1 larger in each rounded
part of the felt bib. Layout each of the loose pearls where you want
them to be and using a small dab of Gorilla Glue and stitch each
loose pearl down.

Step 3:
Cut your
ribbon the length you want (I used 12” for each side) and stitch
the ribbon to each side of the felt bib. Using an iron fold down the
end of the ribbon and iron it down and then fold it down again on top
of itself and iron it again. Thread a loose pearl onto the needle and
thread and stitch it onto the folded end of the ribbon. Then stitch
another pearl on the opposite side of the ribbon. I used 3 pearls on
each side of the ribbon totaling 6 pearls on each ribbon end.


Step 4:
Using a
24” strand of pearls was just there right amount for this bib
necklace. The strand I used was perfect because each pearl had a knot
holding it into place. So when I cut it to length no pearls fell off.
But if you can't find a strand of pearls like that thread the pearls
onto a thin string and knot it off. Around the edge of the felt bib
put a thin line of Gorilla Glue and glue down the strand pearls. Make
sure you don't put to much glue because when it dries it expands and
you don't want there to be glue residue around your pearls. Once you
glue the pearls down let the whole assembly dry for at least 30
minute before you try to move it. For extra security stitch down
different areas of the pearl strand but if you glue it right the
Gorilla Glue should hold down the pearls without stitching.


In these
4 easy steps you can create a one-of-a-kind beautiful necklace. When
people comment about how much they love it and you know they will.
You can say “I know a great jewelry designer who can make you one”
and then totally brag that it was you!
haha, it is lovely! I want one!!!
ReplyDeleteThanks....I can make you one ;)
ReplyDelete