Unique DIY Bride and Bridesmaids Hangers
This tutorial shows a few quick ways to
dress up a hanger for a bride and her bridal party on her wedding
day. Since you put so much time into picking out the dress, trying on
the dress, and fitting the dress…shouldn’t your dresses hanger be
special for your big day. Not to mention these hangers will look
great in pre-wedding pictures. Also if you make a unique hanger for
each of your bridesmaids they will feel bad for calling you
bridezilla behind your back for all those months….hehe!
What you will need:
- DSMeeBee Free Hanger Organizer Pattern
- Wooden Hangers – From my closet but you can get them at any big box store.
- Felt - $2 a yard
- Trim / Ribbon / Lace – $0.40 a yard
- Your local fabric store should have some cute options for you hanger.
- Acrylic Paint – Any color you want
- Foam Brush
- Large Eyelet Kit – $3
- I got mine from my local fabric store.
- Sewing Machine – Brother SE400
Things you will need from home:
- Scissors
- Hammer
Step 1:
Take your hanger(s) and paint them your
desired color. Have a place step up where they can hang out to dry.
Step 2:
Get your trim out! I love trim and
luckily the fabric store down the street from me has tons of them!
From these two hanger examples I am using a soft rose trim and a
woven trim with pearls sewn into it. All of these trim were bought
from the store as they appear in the pictures. All I had to do was
measure the length and cut!
Step 3:
Get your pre-measured trim and glue
your trim to your hanger and let it dry laying flat. I use a mix
between Elmers and hot glue because the hot glue will hole the trim
down faster and the Elmers glue will hold the trim longer. Now you
already have a beautiful hanger for your wedding dress for
bridesmaids’ dresses. But if you want to finish the look follow
steps 4-9.
Step 4: Optional
If you so happen to have a Brother
SE400 sewing machine then you know embroidering a bride's or
bridesmaid's name is super easy and fast. If you don't have this
machine I totally suggest investing in one. The machine is $265 but
totally worth it if you plan on doing your own embroidery.
Step 5:
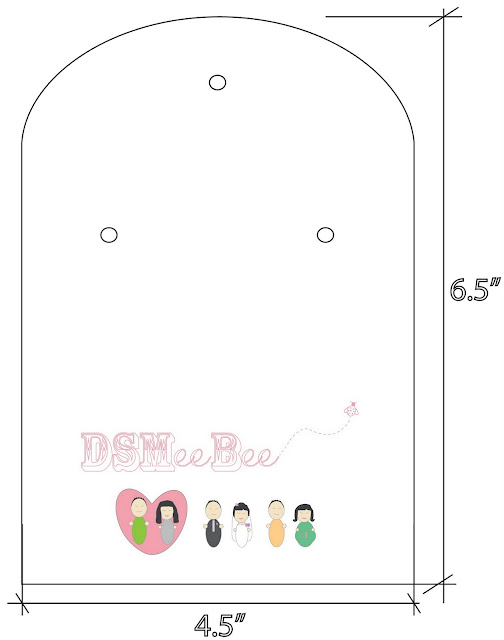
Print out your DSMeeBee Free Hanger
Organizer Pattern and cut it out and punch out the holes for the
eyelets. Fold the template in half and cut it out of a piece of felt.
If you embroidered the felt already cut the Organizer pattern out of
the felt you already embroidered.
Step 6:
Using a pencil mark where you will cut
holes through the organizer template. After the hole are marked us a
pair of pointy sharp scissors to cut a small holes where your pencil
marks are. Also use a pencil and push it through the small holes you
already cut.
Get your large eyelet kit and follow
the directions on the back of the package.
Step 8:
Once you have cut out your felt and put
your eyelets in. Sew on the lace with a sewing machine or with a
needle and thread.
Step 9:
Hang the hanger organizer on the hook
of the hanger and put the necklace the bride or bridesmaids will wear
and poke earrings through the front of the organizer. All of the
brides or bridesmaids’ jewelry and dress will be beautifully
organized in this one of a kind hanger.
This hanger is not much effort and it
defiantly won’t make or break your day but it is the beautiful
little details that can make a wedding extra special! ENJOY!


No comments:
Post a Comment