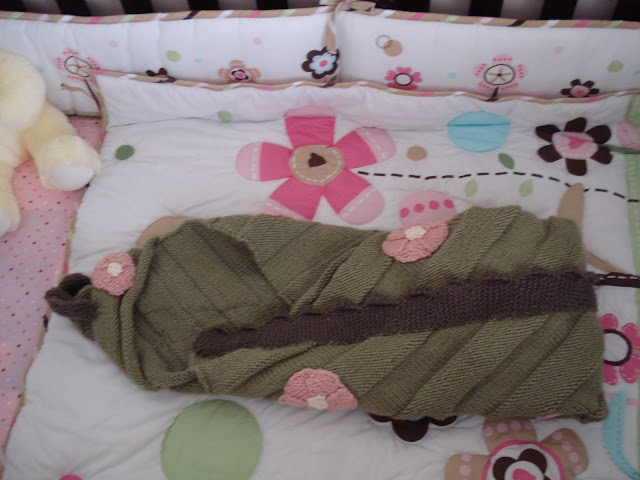
This is a simple knit baby blanket. It does take awhile to knit but the pattern is super simple. I used 4 scans of Lion Brand yarn (color 173) Dusty Green. I used 100% acrylic yard because it is easier to wash than wool but of course you can use any natural fiber yarn as well. For the dragon tail I used one scan of Lion Brand yarn (color 125) Taupe and for the flowers I used one scan of Lion Brand Pink. The white centers of the flowers I used a white cotton yarn but you could used anything or any color.
Blanket:
I used size 8 US 32in circular needles and casted on 150 stitches. I did a simple stockinette stitch and reversed it every 5 inches. A stockinette stitch is when you knit on the right side and then you purl on the wrong side. When you want to reverse the stitch you knit on the right side and when you turn over your knitting instead of purling on the wrong side you knit again. Then you continue every other row purling and knitting till you knit 5 inches and then reverse the pattern again. I made my blanket 35" x 35" which is a nice big size so the baby that you give it to can grow into it.
Hood:
Cast On - 50 stitches
Work as though you were in the blanket. (Stockinette 5 inches and then reverse)
Work as though you were in the blanket. (Stockinette 5 inches and then reverse)
Except you must decrease - every right side (knit) row: K1, slip slip knit, k to 3 st from end, k2tog, K1
Decrease till you have 3 stitches left and then bind off.
After you bind off cut a long tail from the scan of yarn so you have enough to sew the triangular hood to one corner of the blanket.
Dragon Tale:
Cast on 7 stitches
R1: Knit 5, increase by working into front and then back of stitch, Knit 1
R2: Knit 1, increase in next stitch, Knit 6
R3: Knit 7, increase in next stitch, Knit 1
R4: Knit 1, increase in next stitch, Knit 8
R5: Knit 9, increase in next stitch, Knit 1
R6: Knit 1, increase in next stitch, Knit 10
R7: Knit 11, increase in next stitch, Knit 1
R8: Knit 1, increase in next stitch, Knit 12
R9: Knit 12, Knit 2 Together, Knit 1
R10: Knit 1, Knit 2 Together, Knit 11
R11: Knit 10, Knit 2 Together, Knit 1
R12: Knit 1, Knit 2 Together, Knit 9
R13: Knit 8, Knit 2 Together, Knit 1
R14: Knit 1, Knit 2 Together, Knit 7
R15: Knit 6, Knit 2 Together, Knit 1
R16: Knit 1, Knit 2 Together, Knit 5
Repeat Rows 1-16 till you have a til long enough to run down the hood and the back of the blanket. Then bind off and sew into the back of the hood and blanket.
Flowers:
For the flowers I worked in garter stitch.
Cast on 7 stitches
R1: Knit
R2: Knit 1, Increase 1, Knit till you have one stitch left, Increase 1, Knit 1 (9 stitches)
R3: Knit
R3: Knit
R4: Knit 1, Increase 1, Knit till you have one stitch left, Increase 1, Knit 1 (11 stitches)
R5: Knit
R6: Knit 1, Decrease 1, Knit till you have one stitch left, Decrease 1, Knit 1 (9 stitches)
R7: Knit
R8: Knit 1, Decrease 1, Knit till you have one stitch left, Decrease 1, Knit 1 (7 stitches)
R9: Knit
R10: Knit 1, Decrease 1, Knit till you have one stitch left, Decrease 1, Knit 1 (5 stitches)
R11: Knit
R12: Knit 1, Decrease 1, Knit till you have one stitch left, Decrease 1, Knit 1 (3 stitches)
Bind Off, cut a long enough tail to sew into the next peddle.
Make 5 peddles and then sew each peddle into the next.
Middle of the flower:
Cast on 3 stitches
R1: Knit
R2: Knit 1, Increase 1, Knit till you have one stitch left, Increase 1, Knit 1 (5 stitches)
R3: Knit
R4: Knit 1, Increase 1, Knit till you have one stitch left, Increase 1, Knit 1 (7 stitches)
R5: Knit
R6: Knit 1, Decrease 1, Knit till you have one stitch left, Decrease 1, Knit 1 (5 stitches)
R7: Knit
R8: Knit 1, Decrease 1, Knit till you have one stitch left, Decrease 1, Knit 1 (3 stitches)
Bind off and sew into the top of the peddles. After the flowers are assembled then arrange the flowers on the blanket and then sew them into the blanket. I put one on the hood as an accent.


No comments:
Post a Comment